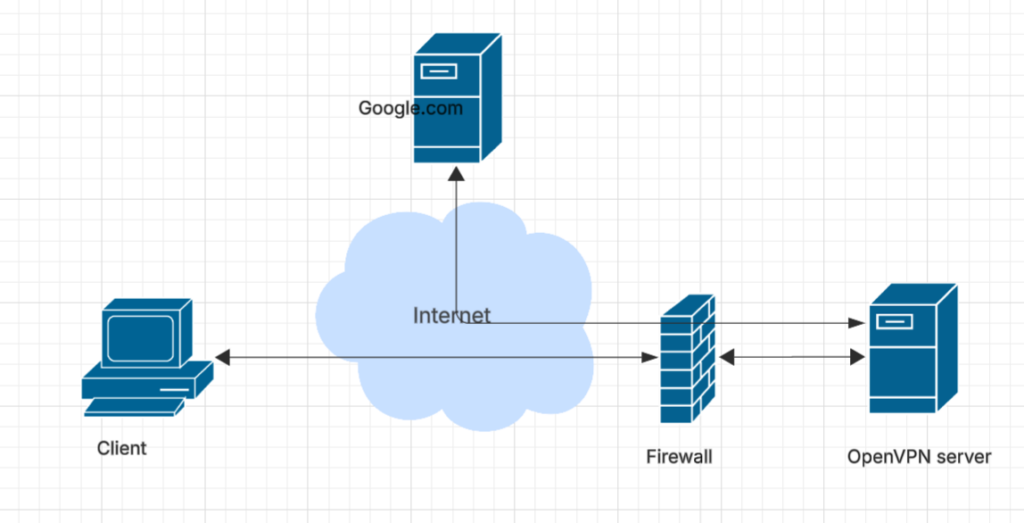
In this page I will get the client to forward all traffic to the server, and then the server to forward all the traffic out onto the internet. This is the classic configuration for IP masking; all the traffic from the client appears on the internet after going through the server, and so to downstream servers like Google it will appear to be coming from the OpenVPN server

Server Network Configuration
Traffic Forwarding
The server will need to be able to forward all IP traffic from the client to its gateway, and then pass responses back to the client. The client will treat the server like a regular internet gateway.
john@ubuntu:~$ sudo nano /etc/sysctl.conf

# Uncomment the next line to enable packet forwarding for IPv4
net.ipv4.ip_forward=1
The reload the network
john@ubuntu:~$ sudo sysctl -p
net.ipv4.ip_forward = 1
Forwarding Rules
Now that we have enabled forwarding of traffic, we have to tell the server how to route the traffic.
Firstly we have to understand what network we are using as it stands –
john@ubuntu:~$ ifconfig
ens6: flags=4163<UP,BROADCAST,RUNNING,MULTICAST>  mtu 1500
        inet 217.160.74.182  netmask 255.255.255.255  broadcast 0.0.0.0
        inet6 fe80::1:e9ff:fe59:302a  prefixlen 64  scopeid 0x20<link>
        ether 02:01:e9:59:30:2a  txqueuelen 1000  (Ethernet)
        RX packets 678884  bytes 193425986 (193.4 MB)
        RX errors 0  dropped 0  overruns 0  frame 0
        TX packets 577009  bytes 103145169 (103.1 MB)
        TX errors 0  dropped 0 overruns 0  carrier 0  collisions 0

lo: flags=73<UP,LOOPBACK,RUNNING>  mtu 65536
        inet 127.0.0.1  netmask 255.0.0.0
        inet6 ::1  prefixlen 128  scopeid 0x10<host>
        loop  txqueuelen 1000  (Local Loopback)
        RX packets 912  bytes 88759 (88.7 KB)
        RX errors 0  dropped 0  overruns 0  frame 0
        TX packets 912  bytes 88759 (88.7 KB)
        TX errors 0  dropped 0 overruns 0  carrier 0  collisions 0

tun0: flags=4305<UP,POINTOPOINT,RUNNING,NOARP,MULTICAST>  mtu 1500
        inet 10.8.0.1  netmask 255.255.255.0  destination 10.8.0.1
        inet6 fe80::356:f3b4:fdb7:934d  prefixlen 64  scopeid 0x20<link>
        unspec 00-00-00-00-00-00-00-00-00-00-00-00-00-00-00-00  txqueuelen 500  (UNSPEC)
        RX packets 525  bytes 187528 (187.5 KB)
        RX errors 0  dropped 0  overruns 0  frame 0
        TX packets 11  bytes 528 (528.0 B)
        TX errors 0  dropped 0 overruns 0  carrier 0  collisions 0
The key point is the network device is ens6. You can see the tun0 interface created by OpenVPN which has the IP address of 10.8.0.1. This address will match up to the address specified in the OpenVPN server.conf file.
Uncomplicated Firewall (ufw) will be used to forward the traffic. We’ll edit the rules in “before” section so the are processed before any other rules.
sudo nano /etc/ufw/before.rulesMy device is called ens6, and the OpenVPN address is 10.8.0.1 so I add the following lines
#
# rules.before
#
# Rules that should be run before the ufw command line added rules. Custom
# rules should be added to one of these chains:
#   ufw-before-input
#   ufw-before-output
#   ufw-before-forward
#

# START OPENVPN RULES
# NAT table rules
*nat
:POSTROUTING ACCEPT [0:0]
# Allow traffic from OpenVPN client to eth0 (change to the interface you discovered!)
-A POSTROUTING -s 10.8.0.0/8 -o ens6 -j MASQUERADE
COMMIT
# END OPENVPN RULES

# Don't delete these required lines, otherwise there will be errors
Next we have to configure UFW so it will accept forwarded traffic
john@ubuntu:~$ sudo nano /etc/default/ufw

# Set the default forward policy to ACCEPT, DROP or REJECT.  Please note that
# if you change this you will most likely want to adjust your rules
DEFAULT_FORWARD_POLICY="ACCEPT"
Next we open the port 1194 for UDP traffic
john@ubuntu:~$ sudo ufw allow 1194/udp
Rules updated
Rules updated (v6)
Finally, if not done before, we update UFW for SSH
john@ubuntu:~$ sudo ufw allow OpenSSH
Rules updated
Rules updated (v6)
Restart the firewall
john@ubuntu:~$ sudo ufw disable
Firewall stopped and disabled on system startup

john@ubuntu:~$ sudo ufw enable
Command may disrupt existing ssh connections. Proceed with operation (y|n)? y
Firewall is active and enabled on system startup
check the firewall:
john@ubuntu:~$ sudo ufw status
Status: active

To                         Action      From
--                         ------      ----
1194/udp                   ALLOW       Anywhere
OpenSSH                    ALLOW       Anywhere
1194/udp (v6)              ALLOW       Anywhere (v6)
OpenSSH (v6)               ALLOW       Anywhere (v6)
That’s it!
Connect the Client
Using Tunnelblick if you reconnect you’ll get the following message
2025-03-03 18:53:08.090524 Initialization Sequence Completed
2025-03-03 18:53:08.090612 MANAGEMENT: >STATE:1741027988,CONNECTED,SUCCESS,10.8.0.2,217.160.74.182,1194,,
2025-03-03 18:53:08.090626 Data Channel: cipher 'AES-256-GCM', peer-id: 1
2025-03-03 18:53:08.090633 Timers: ping 10, ping-restart 120
2025-03-03 18:53:08.090639 Protocol options: protocol-flags cc-exit tls-ekm dyn-tls-crypt
2025-03-03 18:53:09.206618 *Tunnelblick: Warning: DNS server address  is not being used.


2025-03-03 18:53:09.214758 *Tunnelblick: Warning: DNS server address 192.168.1.254 is being used but should not be used. That may indicate that more than one network interface is active. Tunnelblick does not support multiple active network interfaces.


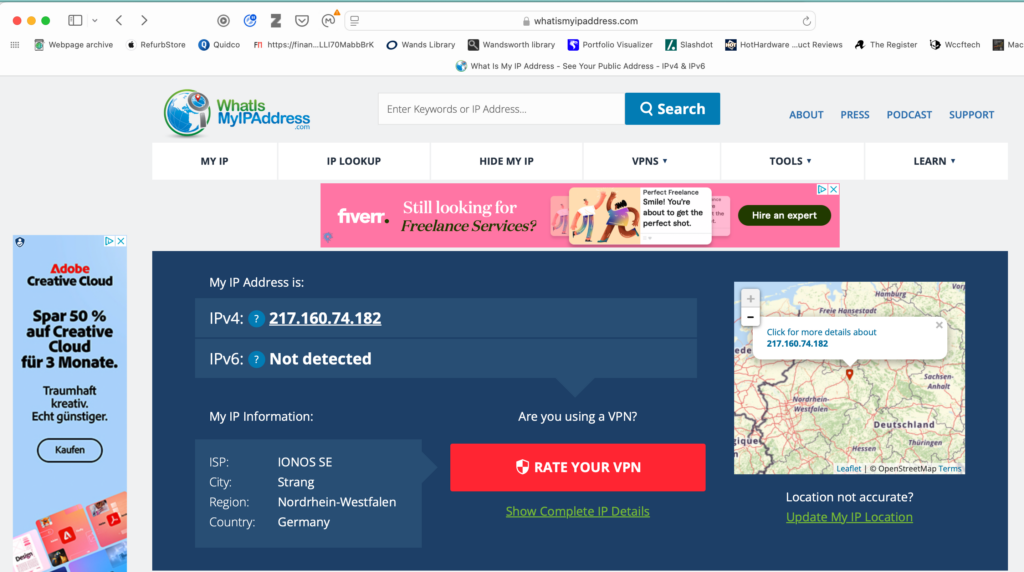
2025-03-03 18:53:14.683584 *Tunnelblick: This computer's apparent public IP address changed from 91.110.91.84 before connection to 217.160.74.182 after connection
So we now have the IP address of the server when connecting to the internet.
We can check this on what website https://whatismyipaddress.com. You simply go to the page and it’ll detect your IP address and you rough geographic location

Although all the internet traffic is going to the server, there is a bit of data leaking out the sides, The DNS traffic, which as the warning above shows, is still going to the local router which will forward it on to DNS server configured by the router – which is normally the ISP.
In the next step we update the server again to plug this hole. See DNS considerations for more info.

